Julia Notes Day4 -- Module,Package and Environment
Module
Modules in Julia help organize code into coherent units. They are delimited syntactically inside module NameOfModule ... end.Typically, in larger Julia packages you will see module code organized into files, eg
module SomeModule

# export, using, import statements are usually here; we discuss these below

include("file1.jl")
include("file2.jl")

end
Files and file names are mostly unrelated to modules; modules are associated only with module expressions. One can have multiple files per module, and multiple modules per file. include behaves as if the contents of the source file were evaluated in the global scope of the including module.
# math.jl
module SomeModuleMath
export add

add(x, y=5) = x + y
end
To load a module from a package, the statement using ModuleName can be used. To load a module from a locally defined module, a dot needs to be added before the module name like using .ModuleName.
# main1.jl
include("math.jl") # first include file for locally defined module
using .SomeModuleMath

println(add(3,3))
In contrast, import brings only the module name into scope.
An identifier brought into scope by import or using can be renamed with the keyword as. This is useful for working around name conflicts as well as for shortening names.
# main2.jl
include("math.jl") # first include file for locally defined module
import .SomeModuleMath as MyMath

println(MyMath.add(5,3))
Package
Pkg is Julia's package manager.
Pkg comes with a REPL. Enter the Pkg REPL by pressing ] from the Julia REPL. To get back to the Julia REPL, press Ctrl+C or backspace (when the REPL cursor is at the beginning of the input).
To add a package, use add:
(@v1.10) pkg> add UnicodePlots
After the package is installed, it can be loaded into the Julia session:
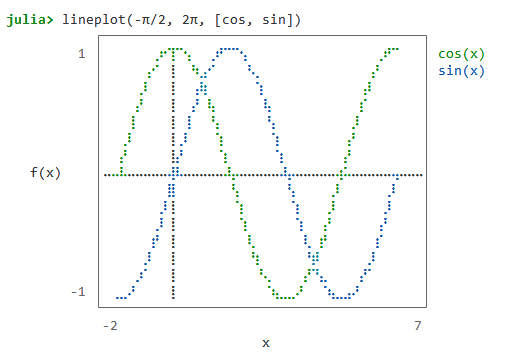
julia> using UnicodePlots

julia> lineplot(-π/2, 2π, [cos, sin])
The status command (or the shorter st command) can be used to see installed packages.
To remove packages, use rm (or remove).
Use up (or update) to update the installed packages.
If a package is not in a registry, it can be added by specifying a URL to the Git repository:
(@v1.10) pkg> add https://github.com/fredrikekre/ImportMacros.jl
Environment
You may have noticed the (@v1.10) in the REPL prompt. This lets us know that v1.10 is the active environment. Different environments can have different totally different packages and versions installed from another environment. The active environment is the environment that will be modified by Pkg commands such as add, rm and update.
So far we have added packages to the default environment at ~/.julia/environments/v1.10. It is however easy to create other, independent, projects. This approach has the benefit of allowing you to check in a Project.toml, and even a Manifest.toml if you wish, into version control (e.g. git) alongside your code.
active environment
In order to create a new project, create a directory for it and then activate that directory to make it the "active project", which package operations manipulate.
To set the active environment, use activate:
(@v1.10) pkg> activate tutorial
[ Info: activating new environment at `~/tutorial/Project.toml`.

(tutorial) pkg>
We can ask for information about the active environment by using status.
It should be pointed out that when two projects use the same package at the same version, the content of this package is not duplicated.
If the project contains a manifest, this will install the packages in the same state that is given by that manifest. Otherwise, it will resolve the latest versions of the dependencies compatible with the project.
instantiate
Note that activate by itself does not install missing dependencies. If you only have a Project.toml, a Manifest.toml must be generated by "resolving" the environment, then any missing packages must be installed and precompiled. instantiate does all this for you.
If you already have a resolved Manifest.toml, then you will still need to ensure that the packages are installed and with the correct versions. Again instantiate does this for you.
In short, instantiate is your friend to make sure an environment is ready to use. If there's nothing to do, instantiate does nothing.
shell> git clone https://github.com/JuliaLang/Example.jl.git
Cloning into 'Example.jl'...
...

(@v1.10) pkg> activate Example.jl
Activating project at `~/Example.jl`

(Example) pkg> instantiate
  No Changes to `~/Example.jl/Project.toml`
  No Changes to `~/Example.jl/Manifest.toml`
shared environment
A "shared" environment is simply an environment that exists in ~/.julia/environments. The default v1.10 environment is therefore a shared environment.
Shared environments can be activated with the --shared flag to activate:
(@v1.10) pkg> activate --shared mysharedenv
  Activating project at `~/.julia/environments/mysharedenv`

(@mysharedenv) pkg>
precompile package
By default, any package that is added to a project or updated in a Pkg action will be automatically precompiled, along with its dependencies.